
How to Resize an Image in GIMP: Step-by-Step Guide (2023)
One of the most common image editing tasks is resizing an image, and GIMP is the perfect tool for the job. It doesn’t matter if you’re resizing images for your social media, your website, or to print out and hang on your wall, this post will cover them all.
This guide assumes you already have GIMP installed, and that the image you want to resize is saved on your computer or removable drive. If you haven’t done that, you can learn how to install GIMP here.
I’ve used screenshots from the Windows version of GIMP, but the process is identical on macOS and Linux.
The Instant Guide to Resizing Images with GIMP
1. Open your image
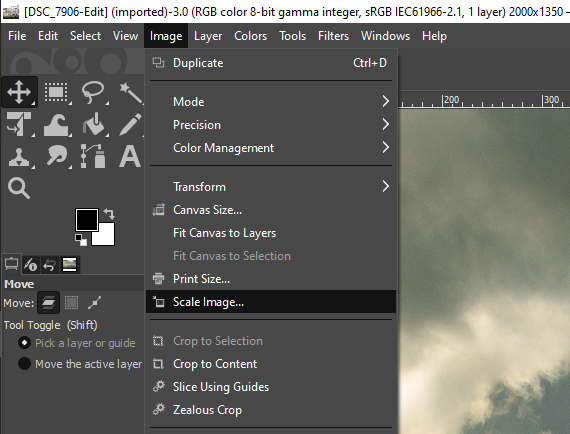
2. Select Scale Image from the Image menu
3. Enter a new size for your image in pixels (px) or switch to percentage scaling by selecting the px dropdown menu and choosing percent.
4. Click the Scale button and check the result. If it’s not what you wanted, go back to Step 2.
5. Click the File menu, and choose Export As to save your file as a standard JPG file.
That’s it! But if you want to follow along more closely and learn more about the various settings and options along the way, we’ve got a more in-depth guide to how to resize an image with GIMP right below.
Resizing Images with GIMP
If you’re new to the world of GIMP and image editing, you’ve probably got a million questions! I can answer this one in just a few simple steps:
Step 1: Load GIMP and open the image you want to resize using the File -> Open command, or drag and drop your image file onto an empty part of the GIMP workspace.

If the image you want to resize has an embedded color profile, you may see a popup like this one when you open your file.
Unless you want to do color editing as well as resizing, choose Convert. (Color management is a huge topic that we won’t get into now, but you can learn more about it here.)

Step 2: Select the Image menu from the bar at the top, and choose Scale Image.
Step 3: The Scale Image dialog box will appear, allowing you to type in a new size for your image.

The image size is set to display in pixels, but you can choose from a range of options. The percentage option is the most useful alternative since it makes it easy to reduce your image to half or a quarter of its current size without doing any math.
By default, the Scale Image dialog is set to keep your image locked in the current aspect ratio. You can disable this lock by clicking the grey ‘chain link’ icon between the Width and Height boxes, but it will distort your image so skip it unless you really need to turn it off.
Don’t adjust the X Resolution and Y Resolution sections. We’ll discuss them later in the section on resizing images for print, but they don’t impact the actual pixel dimensions of your image.
You can experiment with the Interpolation setting if you want to, but the default ‘Cubic’ is best for most images unless you’re resizing 8-bit style pixel art or engineering drawings.
If you need extreme precision on line drawings for scientific or engineering purposes, try the LoHalo or NoHalo interpolation options, but they aren’t the best choice for every situation.
Remember, if you get turned around while experimenting with all the choices available, you can always click the ‘Reset’ button to reset all the options to their default settings.
Step 4: Once you’re happy with the new size of your image, click the Scale button at the bottom of the dialog box. The image in your GIMP workspace will resize to match the new dimensions.
If you change your mind or something isn’t quite right, you can always undo your previous actions and try again by clicking Edit in the menu bar and choosing Undo Scale Image, or pressing the Ctrl+Z keyboard shortcut (Option+Z on macOS).
You undo multiple steps if you need to, so feel free to experiment!
Important tip: Always be aware of your zoom setting! GIMP usually opens images so that you can see everything all at once, but sometimes this means it has to zoom out extremely far.
If the image you open seems too large or too small, check your zoom setting in the bottom left area of the workspace. Remember that the zoom setting doesn’t actually change your image, just how it displays within GIMP.
Step 5: The last step is to save your resized image. There are a number of different file formats for saving images, but the simplest method is to stick to the same file format as you started with.
Click the File menu and choose Export As to save as one of the more common file types such as JPG or PNG.

GIMP will assume that you want to save the image in the same format as you started with, but if you need to choose a different type, click the Select File Type (By Extension) button to see a list of options.
You can also save as GIMP’s native XCF file format by clicking the File menu and choosing Save As, but then it can only be opened by GIMP. This is useful when you’ve done some more complicated editing, but isn’t necessary for just resizing your image.
Congratulations, you’ve just resized your first image with GIMP! If you want to learn more about resizing images for printing, then feel free to read on.
Resizing Images for Printing with GIMP
Stop me if this has happened to you before: you find a great picture online that looks high quality on your screen, but when you go to print it, the image comes out looking terrible!
This is usually caused by a problem with the ‘dots per inch’ or DPI of your photo. Images on computer screens are usually displayed at 72 dots per inch, but high-quality photo prints are closer to 300 DPI.
The simplest way to get your printer to play nice is to resize your image to 300 DPI instead of 72 DPI. Some printer software will do this for you, but resizing the image with GIMP will give you the best quality result.
Fortunately, it’s just as easy as resizing your image for the screen.
Step 1: Start GIMP and load your image with the File -> Open command, or by dragging your image and dropping it onto the empty GIMP workspace.
Step 2: Select the Image menu from the bar at the top, and choose Scale Image.
Step 3: The Scale Image dialog box appears, but instead of adjusting the width and height, we want to adjust the X and Y resolution. You can adjust both at the same time if you need to.
The standard resolution for on-screen display is 72 DPI, which is probably the default setting for your image. Photo-quality print resolution is 300 DPI, so just enter ‘300’ in either the X resolution or Y resolution box, and the other value should update to match.
Unless you know exactly why you want different values for X and Y, leave them linked at the same value (shown by the small ‘chain link’ icon between the two input boxes).
Note: Dots per inch (DPI) and pixels per inch (PPI) are the same thing. DPI is just an older term, from way back before the word ‘pixel’ was in common usage.
Step 4: Click the Scale button, and you’re done! Remember, this process doesn’t change the pixel values of your image, so you shouldn’t see any difference in how the image is displayed on-screen, but your prints will look their best.
That’s all there is to it!
About Thomas Boldt


