
How to Resize an Image in Photoshop Without Losing Quality
Resizing an image using photoshop is a relatively straightforward process. However, if you’re new to editing images, there is a bit of a learning curve. It is important to understand the fundamentals of how to change an image’s size in photoshop without losing quality.
Maintaining the original image’s quality can prove challenging. Resized photos often suffer from problems such as pixelation, fuzziness, cropping, and stretching. If you’re wondering how to resize a photo in photoshop without losing quality, you’ve come to the right place. In this guide, we will outline the techniques you can use to resize images without losing quality.
Mục lục
How to Resize an Image in Photoshop
Resizing photos is one of the most common uses of photoshop. Whether you’re a beginner or an expert, sooner or later, you’ll most likely need to adjust the size and resolution of an image. The number of tools available for this task can make learning to resize a photo overwhelming. In this section, we’ll review the basics of resizing images using photoshop.
What is image resizing?
Before explaining the different ways you can change a photo’s size in Photoshop, it’s essential to understand image resizing basics. When you resize a picture, you change its width and height without removing anything. As the name suggests, resizing an image changes its size.
Images are made up of points of data called pixels. The number of pixels an image has is determined by multiplying the width and height with both measured in pixels.
A resized picture has new width and height dimensions; however, resizing a picture does not change the number of pixels; instead, it changes the image resolution. The image will print at a different size than the original image.
Adjust Image Size
The most straightforward method for resizing a picture in photoshop is selecting the image size option under photoshop’s image menu. To do this, go to Image > Image Size in photoshop’s menu bar.
A new window will open, giving you the option to adjust the image’s pixels or inches. Changing pixels is the best option if you plan to use the image online, while inches are a better option for printing.
Click “OK” once you’ve finished making changes to the image. Be sure to save the changes you’ve made by going to File>Save or File>Save As. File>Save saves over the original file; File>Save As lets you preserve the original files while creating a new file.
Crop Image
If you’re satisfied with your image’s size but want to remove specific areas or focus on certain parts of the image, you’ll want to use Photoshop’s crop tool to change the photo’s width and height. You can find the crop tool in the tools panel on the left side of your screen.
After clicking the crop tool, crop borders will appear around your image’s edges. Drag the crop handles to adjust the crop box. The part of the picture that won’t be removed will be visible inside the crop box. Hold down the shift button if you want to retain the same aspect ratio as the original photo.
Change Canvas Size
Another useful way to change the size of an image using Photoshop is by changing the canvas’s size. This method doesn’t change the image’s size; instead, it recasts the image’s boundaries. To make these changes go to Image > Canvas Size. There are two options for changing the canvas size.
- Enter new dimensions for the width and height of the canvas
- Check the relative box, which lets you select how many pixels to add or remove to the canvas
How is Resolution Really Measured?
Resolution refers to the image quality a printer produces or monitor displays. There are various ways to measure resolution, depending on the device used.
- Pixels per inch (monitors)
- Samples per inch (scanners)
- Data per inch (printers)
Print Resolution Explained
The number of dots a device prints per inch of page space is how we determine the print resolution. Print resolution refers to the level of detail on a printed page. More dots equals a higher quality image.
DPI measures data per inch horizontally and vertically. You’ll often see it written in this way: 600x 600dpi with the first number representing horizontal dots and the second number representing vertical dots.
There is significant variation in print resolutions depending on whether you’re using an inkjet or laserjet printer. Most office printers don’t have a resolution higher than 1200x 1200dpi. To print at higher resolutions, you would need to go to a store that specializes in printing.
Digital Resolution Explained
When we think about image resolution, pixels often come to mind. Image resolution refers to the size of the units of information representing a unit. Pixels per inch are the units that determine an image’s resolution.
Images have more pixels per inch (PPI) at higher resolutions resulting in high-quality images. At lower resolutions, images have fewer PPI. Stretching a picture can result in huge pixels that are visible.
The size of the units of information representing an image determines its resolution. Pixels are the information units monitors display. Pixels contain a defined amount of data. The more pixels used to describe an image, the more detailed the image becomes.
How to Describe an Image Size
To determine image size, multiply an image’s resolution by the image’s width and height. How you receive the image will determine its width and height. For example, a photo taken with a camera will have a different size than a scanned image.
Pixel Dimensions
An image’s horizontal and vertical measurements expressed in pixels are referred to as pixel dimensions. You can determine the pixel dimensions by multiplying both the width and height by the DPI. Digital cameras also have pixel dimensions: the number of horizontal and vertical pixels representing its resolution.
Document Size
When working with Photoshop, the document size can be confusing. The document size is how big an image can be printed at any given resolution. There are two ways of understanding document size:
- Size of paper needed to print a digital image at the PPI of the Photo as displayed in Photoshop
- The PPI that fits the size of paper being used
Constrain Proportions
When resizing an image Photoshop will allow you to maintain your image’s proportions by linking the width and height together. If you change an image’s width, Photoshop will automatically adjust the height, and the same is true in reverse. Constraining proportions prevents image distortion when you change the size.
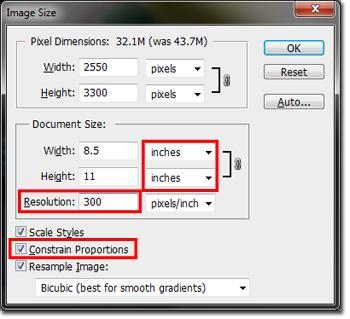
Constrain proportions is a default Photoshop setting. Ensure the box next to constrain proportions is checked to maintain your image’s proportions. You’ll usually want to select this option; however, if you’d like to scale your image’s width and height independently, simply uncheck the constrain proportions box.
Scale Styles
When we speak of scale styles in Photoshop, we refer to any effects applied to an image layer. Selecting the scale styles option resizes any effects you make to an image layer in proportion to the change in the photo’s size.
If scale styles isn’t selected, the effects you apply to a layer won’t change when you change the photo’s size. If you’re working with layering effects such as strokes, drop shadows, bevel, or emboss, you’ll most likely want to scale styles to adjust the effects sizing along with the sizing of the image.
Resizing an Image and Photoshop Interpolation
Interpolation is Photoshop’s method for analyzing the original pixels’ colors to make new pixels when resizing an image. These new pixels are added to the already existing pixels. Photoshop takes an average of the pixels, creating a smooth image.
You can select the interpolation method in photoshop’s image size box. Selecting the appropriate interpolation method for the image your working with is essential because some methods work better with certain images. In this section, we’ll look at how to use photoshop interpolation.
Resample Image
In contrast to image resizing, which only changes an image’s size, resampling changes the pixel dimensions, aka the number of pixels in an image. Image quality may deteriorate as a result of resampling. Photoshop resamples images in two ways.
- Downsample: Decreases the number of pixels in an image
- Upsampling: Increases the number of pixels in an image
You can select the method you’d like to use in the image size dialog box.
Nearest Neighbor
Photoshop’s Nearest Neighbor is the fastest but least precise way to duplicate pixels. Using this method, photoshop simply copies the values of the original pixels. Nearest neighbor produces less than desirable results unless you’re working with illustrations or images made of colored lines or shapes. It is also an option for preserving hard edges and producing smaller files.
Bi-linear
This method produces better results and is somewhat more complex than the nearest neighbor method. The bi-linear method averages the color of surrounding pixels. Photoshop sets the color or gray value of each pixel based on the pixels surrounding it. Bi-linear is an effective method for upsampling some images.
Bi-cubic Interpolation
Bi-cubic interpolation takes longer than nearest neighbor and bi-linear, but it creates better effects. The bi-cubic method bases each pixel’s value on the pixels surrounding it; much like the bi-linear method, it uses more complex equations causing it to take longer and making it more precise.
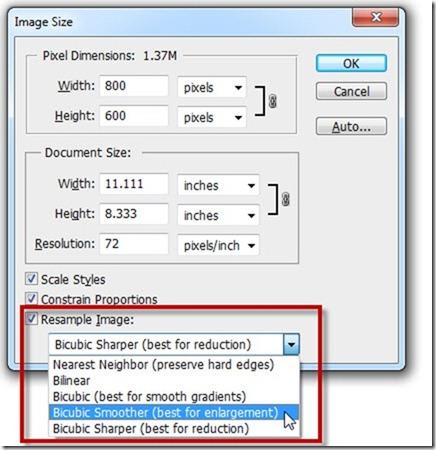
Bi-cubic (best for smooth gradients)
The original bi-cubic interpolation method is best for smooth gradients. It works well for transitions from dark to light, producing results similar to bi-linear but slightly sharper. Bi-cubic works well when reducing image size. It reduces image dimensions without using any kind of sharpening to reduce the image’s size.
With bi-cubic, the image’s colors are kept intact and well-preserved. The image is maintained almost the same way as the original, so when you apply sharpening, you get a very high-quality image without halos or other artifacts.
Bi-cubic Smoother (best for enlargement)
The bi-cubic interpolation method gives a smoother result to images making them better equipped to handle subsequent sharpening. This interpolation method works well when you need to upsample images.
The bi-cubic smoother is recommended for enlarging images because it produces smoother gradients while other methods may result in unwanted artifacts. Bi-cubic smoother works well for upscaling images to a higher quality for newer, high-density displays.
Bi-cubic Sharper (best for reduction)
Use the bi-cubic sharper when reducing images with enhanced sharpening. Bi-cubic sharper is the optimal setting for preserving the sharpness of smaller sized photos. It’s beneficial for designers and photographers who need to shrink their work for use on websites.
The bi-cubic sharper method allows you to maintain the detail in a resampled image. If it oversharpens parts of an image, try using the Bi-cubic method instead.
Stair Step Interpolation
The theory behind stair step interpolation is that enlarging or reducing an image little by little is better than doing it all at once. When using stair step interpolation, you increase or decrease an image’s size by no more than 10% until the image reaches the desired size.
To use stair step interpolation for Photoshop, you need the Stairstep Image Size Plugin. The plugin allows you to specify how much the program increases or decreases your image’s size. If you prefer, you can select the total number of steps the program performs up to ten steps. The plugin resizes images using Photoshop’s bicubic interpolation.
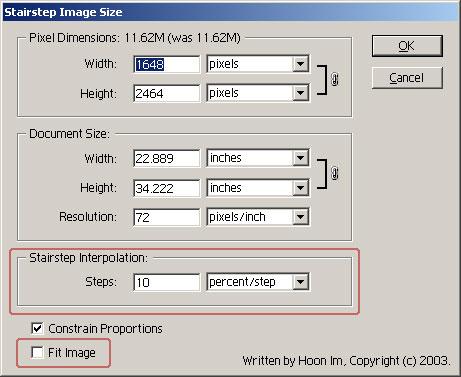
Therefore, if you set the program to increase the image by 100% or 1 step, it’ll resize the image once, giving you the same results as an image using Photoshop’s image size. Click ok once you’ve selected the correct options.
Resizing an Image with Smart Objects
When we refer to a smart object in Photoshop, we’re talking about a layer that contains the same image data information as a standard layer. By preserving the image’s source content and all its attributes, you can edit the layer in a non-destructive manner. Smart objects allow you to change an image’s size as many times as you’d like without degrading the image.
Photoshop gives you the option to embed image contents into a Photoshop document and create linked smart objects containing contents that reference external image files. When a source image file changes, linked smart objects update, allowing you to use a shared source file across multiple Photoshop documents.
According to Adobe, some of the advantages of using smart objects include:
- Ability to make non-destructive transformations including scaling, rotating, skewing, distorting, perspective transform
- Prevents the loss of original data or quality because the transformation doesn’t affect the original data
- Allows you to work with vector data, including vector artwork
- Allows non-destructive filtering. Filters applied to smart objects can be edited at any time
- Linked smart objects update automatically
- Experiment with different low-resolution design placeholder images than you can replace with final versions later
- Allows either a linked or unlinked layer mask to be applied to the smart object layer
Which is the best resizing method to use?
Determining the best resize images depends a great deal on the picture you’re resizing. It’s better to experiment with your images rather than using an automatic option. If your goal is to preserve the quality of the image you’re upscaling or downscaling, smart objects are an attractive option.
Smart objects allow for the non-destructive resizing of objects. Besides smart objects, other methods to resize images in Photoshop involve destructive editing. For example, when decreasing the size of an image, Photoshop removes pixels. Smart Objects avoids the degradation of images encountered when using other methods of resizing images.
Bi-cubic smoother for enlarging images and Bi-cubic sharper for reducing images are also options that work well without significantly degrading image quality.
Tips for Scaling Images in Photoshop
We’ve given you a lot of information on how to change an image’s size in Photoshop without decreasing quality. Here we’ll explain our top tips for scaling images in Photoshop so you can get the job done as efficiently as possible.
- Choose the interpolation method best suited to the image you will resize
- Make a copy of the image you’re going to resize and do all of you work on the copy
- Determine whether you want to reduce or enlarge the size of the image
- Analyze the image to determine whether it would benefit from smoothing or sharpening
- Using smart objects or Bi-cubic interpolation are the best methods for maintaining photo quality
- Remember that anytime you resample an image, some quality will be lost
- Using smart objects allows for nondestructive photo editing without loss of quality
- Minimizing the number of resampling operations will produce higher-quality images
Frequently Asked Questions
Mastering how to change an image’s size in Photoshop without decreasing quality may seem overwhelming at first glance. In case we haven’t answered all of your in our guide, we’ve put together a list of the most frequently asked questions below.
At what size enlargement would you use the bicubic smoother (best for enlargement)?
Images can usually be enlarged to twice their original resolution. If the photo’s original resolution is 600×1200 pixels, you could increase it to 1200×2400 pixels. Determine how much you can enlarge an image based on its original resolution.
If you try to enlarge an image past this point, you’ll begin to experience interpolation problems such as different pixel images showing up in the image.
How do I scale logos to immense proportions without losing quality?
We recommend creating logos in Photoshop using the pen tool. Save the logos in either a PDF or EPS format. Adobe Illustrator also works well because it’s designed explicitly for making vector images, including logos. Vector images can be upscaled infinitely without losing quality.
If you use Adobe Illustrator, you’ll have greater control when creating your original logo file. You can later export it to Photoshop, where you can rasterize it to whatever size you choose.
How do I compress an image in Photoshop without losing quality?
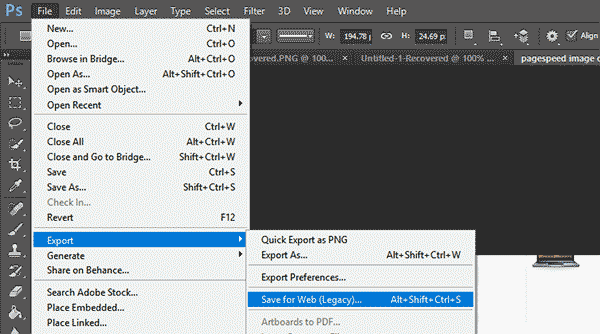
When you compress an image, some loss of quality is inevitable. However, there are ways to minimize the reduction in image quality. To compress a picture in Photoshop, open the image you want to compress.
Click on File>Export>Save for web (legacy)
Next, select the image format:
- JPG: Most applications support JPG, making it the best choice for sharing photos online
- TIFF: If you’re going to print your images at a print shop, this is the best option. TIFFs use a lossless compression algorithm retaining all of their original information.
- PNG: Works well for logos and editing images. It uses lossless compression for displaying images on the internet
- PSD: An excellent option for working with images and using layers. PSD only works with Adobe applications but can be easily converted to JPGs.
After selecting the image format, adjust the quality to your requirement. Colorful images look good in JPG format; images with fewer colors do well with PNG-8 or PNG-24 file formats. You preview the compressed image in the bottom left corner of the preview window.
What is the best resolution for Photoshop?
The best resolution depends on how you’re using the images. The optimal resolution of printed images differs from screen images for use on the web. Choosing the right image resolution is important. Here’s a list of optimal resolutions based on the device.
- Screen images: 72ppi
- Magazine quality: 300ppi
- Desktop laser printers (black and white): 170ppi
- Desktop color inkjet printers: 300ppi
Final Thoughts
When you resize an image using Adobe Photoshop, you can take steps to ensure you preserve the original photo’s quality. Most methods of resizing images with Photoshop will result in some degradation of photo quality. However, there are options such as smart objects and Bi-cubic interpolation that allow you to resize images in a way that preserves their quality.
Reducing an image size and enlarging an image require different approaches. Selecting the ideal method for resizing your images in Photoshop is critical to achieving the results you desire. Knowing how to change an image’s size in photoshop without losing quality will ensure you always have the best quality images on hand for your work.


