
Quality Gates
In this section, we will focus on the built-in quality gate, called Sonar way, which is available in every organization. By default, this is the one assigned to all new projects on import. For information on defining and applying different quality gates, see Setting Your Standards .
A quality gate is an indicator that tells you whether your code meets the minimum level of quality required for your project. It consists of a set of conditions that are applied to the results of each analysis. If the analysis results meet or exceed the quality gate conditions then it shows a Passed status otherwise, it shows a Failed status.
Mục lục
Quality gates appear with analysis results
Quality gates are displayed in the SonarCloud interface in conjunction with the analysis results of the main branch of the project, other non-main branches, and pull requests.
For pull requests, the quality gate will also be displayed in the repository platform as a pull request decoration.
The quality gates will indicate a Passed or Failed status (or if not properly set up, a Not Computed status, see below)
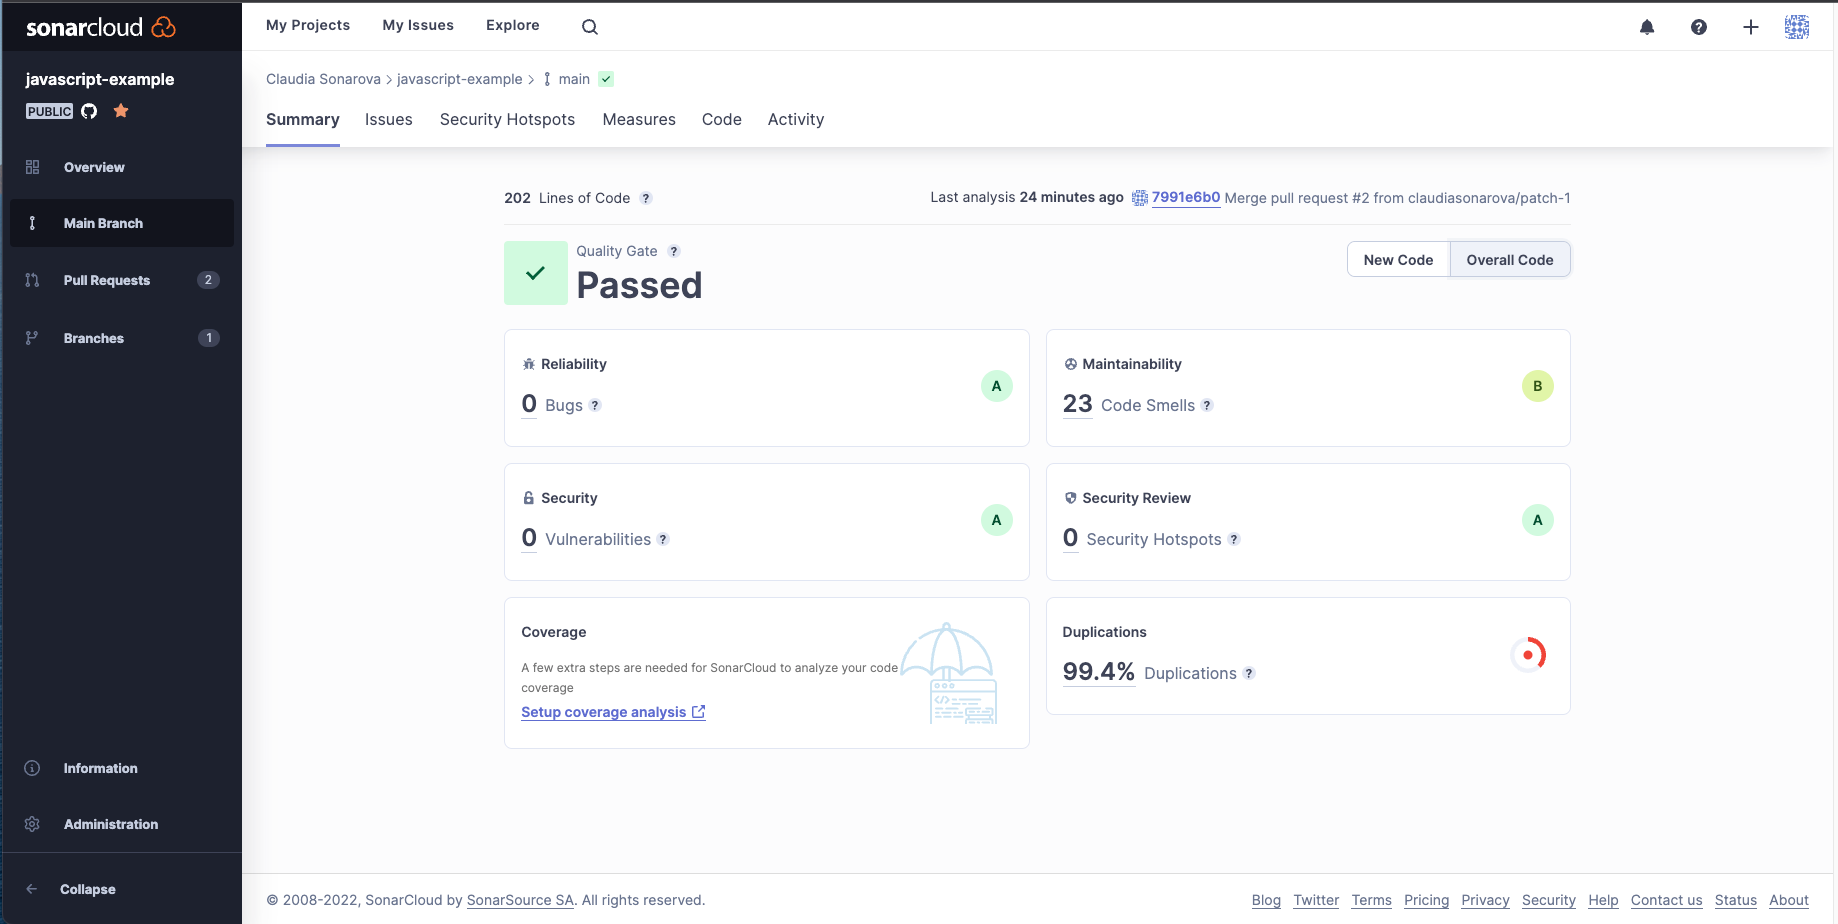
For example, go to Main Branch > Summary > Quality Gate; here you can see the quality gate for the main branch of a project with a Passed status:
If you are using the SonarLint IDE extension, changes to your main branch quality gate will also appear as notifications in your IDE (this only works if you have configured SonarLint to connect to your SonarCloud account).
Getting notified when a quality gate fails
Thanks to the notification mechanism, users can be notified when a change in the quality gate status. At this time, you must subscribe to projects one-at-a-time to receive notifications about changes in the quality gate status. To do so, subscribe to the New quality gate status notification either for each project you’re interested in.
- My Account > Notifications > Notifications per project. From there, select Add a project, search for Your project, and select New Quality Gate status.
- Your Project > Information > Notifications, and select New Quality Gate status.
When is a quality gate not computed?
To calculate a quality gate status for the main branch (or any other long-lived branch), a project must have a new code definition set.
Since a newly created project will often not have a new code definition set up yet, the system will remind you by displaying a Not Computed message in the place where the quality gate status usually appears, like this:

To fix this, click Set New Code Definition.
After setting the new code definition, perform another analysis (by pushing some code change) and a quality gate should appear. For more details on setting up the definition, see New Code Definition.
Note that if you set your new code definition before performing any analyses a quality gate will not appear immediately after your first analysis. You must perform a second, subsequent analysis to trigger the quality gate.
How quality gates are defined
Quality gates are defined by a set of failure conditions applied to the results of an analysis. Two separate sets of conditions can be defined: one that applies only to new code and one that applies to overall code. However, failure conditions are typically applied to the former using the Clean as you Code strategy.
For example, the built-in Sonar way quality gate definition has the following conditions on new code (and no conditions on overall code):
- Coverage is less than 80.0%
- Duplicated Lines is greater than 3.0%
- Maintainability Rating is worse than A
- Reliability Rating is worse than A
- Security Hotspots Reviewed is less than 100%
- Security Rating is worse than A
If one or more conditions are true, then the quality gate is Failed. Otherwise, it is Passed.
How quality gates are calculated
Within a specific project, the same quality gate definition is always used for all quality gate status calculations. However, the way that the calculations are done differs somewhat between the Main Branch, other Branches, and Pull Requests:
Main branch
For the main branch:
- Both the conditions defined on overall code and conditions defined on new code are applied.
- What counts as new code is determined by the prevailing new code definition setting for the main branch, as described in New Code Definition.
Long-lived branches
For long-lived branches other than the main branch:
- Both the conditions defined on overall code and conditions defined on new code are applied.
- What counts as new code is determined by the prevailing new code definition setting for the branch, as described in New Code Definition.
Short-lived branches
For short-lived branches (not associated with pull requests):
- As with the other cases, the quality gate defined at the project level is used, but only conditions defined on new code are applied.
- And, new code is defined as whatever has changed relative to the target branch, as described in Branch Analysis.
Pull requests
- But, only conditions defined on new code are applied.
- And, new code is defined as whatever has changed relative to the target branch, as described in Pull Request Analysis.
How quality gates are used
The purpose of the quality gate is to tell you whether your code is good enough to be pushed to the next step:
- For the main branch and other long-lived branches, the quality gate answers the question: “Can I release my code today?”
- For pull requests (and short-lived branches), the quality gate answers the question: “Can I merge this pull request?”
By keeping an eye on the quality gate you can quickly judge the status of your code and decide on what to do next.
Using quality gates to control release gates
In addition to providing you with information that you can act on yourself, quality gates can also be hooked up to your build process to automatically control a release gate. A release gate is a mechanism that triggers a build pipeline failure if the quality gate fails.


