
Raspberry Pi HQ Camera – Review
Table of contents
RoadTest:
Raspberry Pi HQ Camera
Author:
dougw
Creation date:
11 Nov 2020
Evaluation Type:
Development Boards & Tools
Did you receive all parts the manufacturer stated would be included in the package?:
True
What other parts do you consider comparable to this product?:
e-CAM130_CURB from e-con Systems seems similar, but it has a fixed focus lens
What were the biggest problems encountered?:
There were no major problems, just my usual issues trying to follow software configuration instructions.
Detailed Review:
I had high expectations for this road test, which I will explain, but this road test still exceeded my (high) expectations in a lot more ways than one.
First of all the kit was far more comprehensive than I was expecting. The kit included not just the camera, but also both of the lenses available for the camera; and that’s not all, it also included a Raspberry Pi 4B with 4 GB of RAM. So right out of the box, I already had some very nice surprises, but there were more to come….
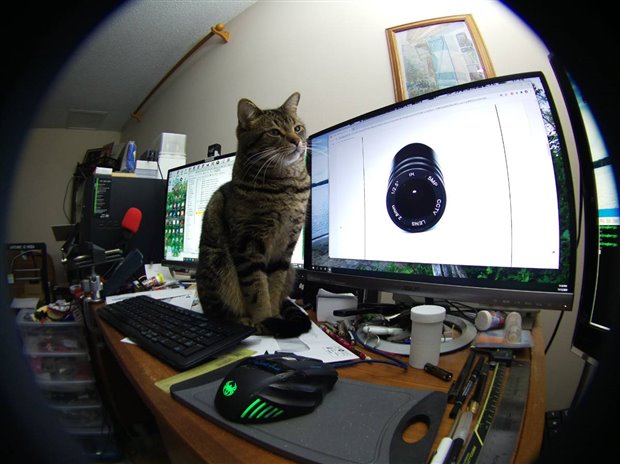
Here is a picture of the unboxing being photobombed by a precocious cat:
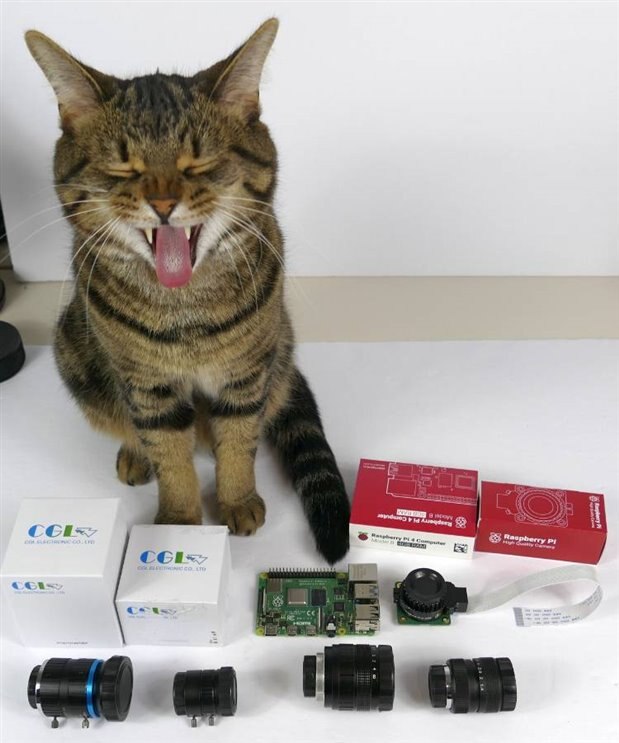
The 2 lenses on the right were borrowed – not part of the kit.
The reason I had high expectations was because I not only wanted to test the latest Pi camera, I wanted to use it in my special application, and use it often and extensively. If it worked out it would become my most used Raspberry Pi application of all time, which I will get to, but first I need to get a sample picture up here to introduce the camera.
Raspberry Pi’s have had a camera connector for ever so it isn’t a huge surprise that there is some software around to handle cameras, however I was pleasantly surprised at how extensive the camera support is that is built right into the Raspberry Pi operating system. I will show some of the options later, but I was happy to see that it had no problems at all handling the new HQ camera.
As soon as I got everything plugged in and software loaded, who should be sitting there but Nugget, the cat – so I snapped a picture… here is the first picture taken with the new HQ Camera…(7.66MB) Click on the picture to see it in higher resolution.
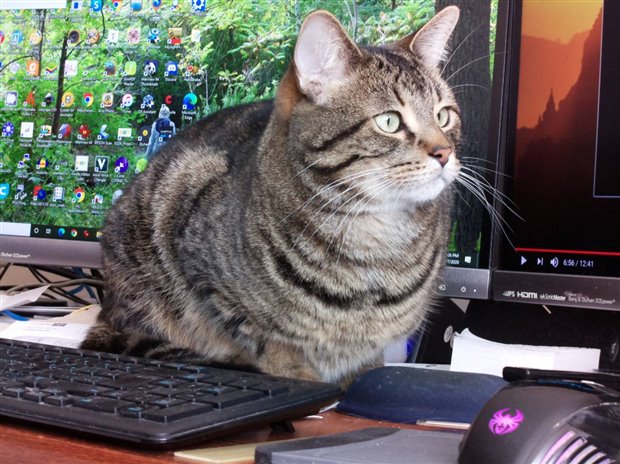
I didn’t do anything special and did not doctor the image at all and it it just taken with whatever ambient light was around. It is a good subject to show image resolution – you can see individual hairs over a large depth of field. If I zoom in, jpeg compression artifacts are easily spotted however I am impressed – I would be happy with this picture quality if it was taken with my big (expensive) camera. This picture was taken with the 16mm lens included in the kit. I found the manual iris and focus controls to be much more intuitive and quicker than using fancy digital camera buttons and menus. Of course previewing the image on a 22 inch monitor (that third monitor is not in the picture) also made it much easier than squinting at some small display or viewfinder. In this case the cat is staring it his own image – larger than life.
The command to capture this image was “raspistill -o cat.jpg” as shown in this screenshot:
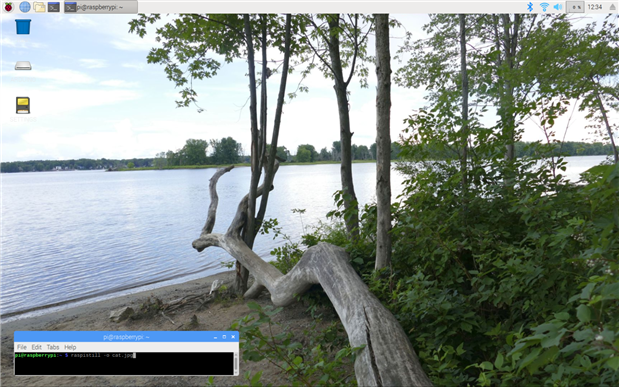
Ottawa River in the Background. (I do enough photography to take all my own screen saver images)
To capture a screenshot just hit the PRTSCR key on the keyboard.
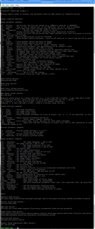
If you just enter “raspistill” you get a list of the options that the command can implement – here is what they look like:
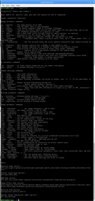
It is a list 91 lines long – hopefully it expands to be visible if you click on it.
Note that this set of options has been worked into a GUI app called RPICameraGUI.
The “raspvid” command implements video preview and capture, and it has an even longer list of options:
One test of the camera that I wanted to start with was to test for stuck pixels. So I put the lens cover on and put the camera in a black bag and took a picture.
Of course it looked completely black, even when examining every pixel. Then I cranked up the gamma by a factor of 50 to see if the noise would be visible. A few green and blue pixels showed up, but that is a serious amount of lightening. Here is the original JPG image if you want to take a look at it:

I know JPG isn’t the way to do this properly, but it worked well enough.
Here is a crop zooming way in on a small area with gamma cranked up:
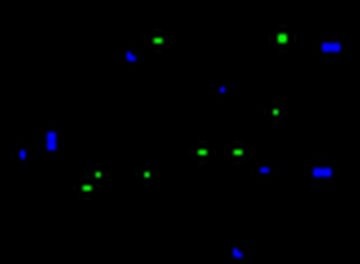
I think this is pretty good performance (no stuck pixels, low noise and good low light sensitivity) although I haven’t done tests like this for a long time. Sony does make great imaging sensors.
My fancy name-brand camera makes it really difficult to do a corresponding test for comparison – firstly it flatly refuses to take a still shot of pitch black and secondly its fancy processor “fixes” any problem pixels before it stores an image and thirdly if the image is dark, it may pull a lot of stunts to try and lighten it up. For example, I can take a movie of pitch black even though it refuses to take a still image, but I don’t know exactly what the processor is doing to the video. Whatever it does introduces a lot of noise.
Okay, those black pictures won’t win any awards, lets try something slightly more interesting – a lens shootout.
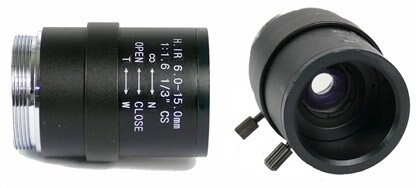
The kit came with 2 lenses (on the left below) and I borrowed 2 lenses (on the right):
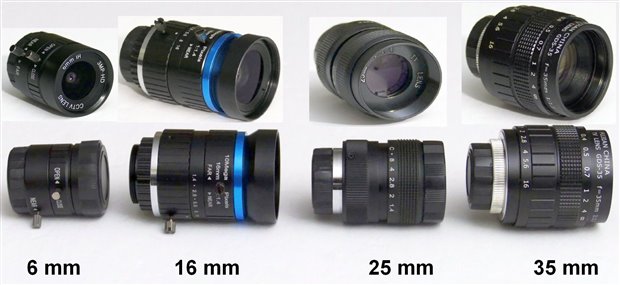
When it comes to figuring out the field of view, it won’t show up in the specs for these lenses, because the field of view depends on the sensor size, but the shorter the focal length, the wider the field of view. These lenses range from about 60 degrees for the lens on the left to about 15 degrees for the one on the right.
In addition to the spacer ring for adapting C-mount lenses, the camera has a back-focus adjustment to adjust the distance between the lens and the camera. This adjustment is critical for zoom lenses – to ensure they stay in focus throughout the zoom range, but for these manually focused lenses it allows the field of view to be adjusted.
Here is a short video showing me trying to focus each of these lenses on a white stucco ceiling from 58 inches away:
You don’t have permission to edit metadata of this video.
Edit media
x
Subject (required)
Brief Description
Tags (separated by comma)
Video visibility in search results
Parent content
Poster
Upload
Preview
Clearly, the 35 mm lens has the narrowest field of view, which is what I want for my application.
A quick note about the Raspberry Pi. In this road test, I am using a Raspberry Pi 3B instead of the Raspberry Pi 4B that was supplied. This is mainly because I only found out about the 4B when the kit arrived and although I ordered a case for it, the case has not arrived yet. The Pi 3B will work just fine for my application and I already have a bucket list project just waiting for a Pi 4B, so it won’t be wasted.
The first thing I need to do for my application is to mount the camera on a tripod. The HQ camera has a tripod mount, but the Raspberry Pi needs to mount on the same tripod, and the camera needs a housing to protect the exposed circuit card.
Here is a video showing how I mounted the Raspberry Pi and protected the camera:
You don’t have permission to edit metadata of this video.
Edit media
x
Subject (required)
Brief Description
Tags (separated by comma)
Video visibility in search results
Parent content
Poster
Upload
Preview
This brings me to the big reason I wanted to get my hands on this camera.
I want to take video of my 3D printer in action. There are several issues with this that need to be overcome:
- the video quality needs to be pretty good because the camera I use for the rest of my videos is very good, and it wouldn’t enhance the blog to insert crappy video.
- the camera needs to be recording for many hours, sometimes even days – this is a problem for my main camera, especially the battery
- the camera needs to take time lapse images that get stitched into a video, so the print video isn’t too boring – nobody is going to watch a 2 day print video
The Pi HQ Camera should have decent still/video and I can run it for days without killing batteries which is why it was so attractive. Another pleasant surprise for me (I have lost count of how many pleasant surprises this road test has encountered, but they aren’t done yet) is that the built-in raspivid command has options to capture time-lapse images right out of the gate.
This really meant I could fulfil my main objective with just a stock Raspberry Pi operating system. However, as I researched it some more, I discovered others had been doing a much better job with Octoprint / Octolapse software. This software allows the Raspberry Pi to directly control the 3D printer as well as the camera, and insert g-code commands to move the print nozzle out of the way after every layer so it can take a clean picture of the new layer. This creates a smooth build video without the nozzle jerking all over the screen and obscuring parts of the print. It also allows the whole process to be remotely monitored over WiFi.
Installing Octoprint and the Octolapse plug-in starts out pretty simply because they provide an entire operating system image called OctoPi. This version of the Raspberry Pi operating system is pretty barebones, so further configuration is pretty manual. However once you have it setup to be accessible from a remote browser, it is a pretty slick browser application.
You then need to go through a fairly detailed setup to ensure the system is configured properly for your specific printer. Fortunately there are several Youtube videos to take you through it. It turns out if you are using Cura to do your printer slicing, it can output directly to Octoprint instead of just a printer file.
Here is a video showing my first a time-lapse video using the built-in raspivid command. It is followed by an Octolapse video so you can see the difference between a normal time-lapse video and a synchronized time-lapse video. The raspivid video is showing the system printing the tripod mount, so the camera is not positioned very well. I also didn’t realize at first that setting the output to 1080p would simply crop the preview image down which initially cut off the the object being printed. So if Octolapse didn’t exist, it would be worth improving the raspivid output by adjusting the settings.
You don’t have permission to edit metadata of this video.
Edit media
x
Subject (required)
Brief Description
Tags (separated by comma)
Video visibility in search results
Parent content
Poster
Upload
Preview
Note how large the small printed object appears in the video. This is due to the narrow field of view of the 35 mm lens. It is a GDS-35, which is quite a popular lens and great value for a $20 lens.
Summary
I still have a lot of tweaking to do to optimize the video quality and the print quality of this system, but it already works much better than I was expecting when I first submitted a proposal for this road test. I expect I will use this system much more than any previous Raspberry Pi system I have worked on.
This camera takes good quality images and video and is a great accessory for a Raspberry Pi.
Now that you can run Open CV on a Raspberry Pi this combination opens up a lot of opportunities to explore decent computer vision at a reasonable cost. And of course it is well suited to my application of synchronized time-lapse photography.
Thanks again to element14, the road test program and rscasny. I learned a lot and created a very useful system in the process.
Late breaking news:
I just received this fun little 2.8 mm wide angle lens (~115 degrees) ($15):
It can focus right up close as well as far away, but the far shots will have to wait for daylight….

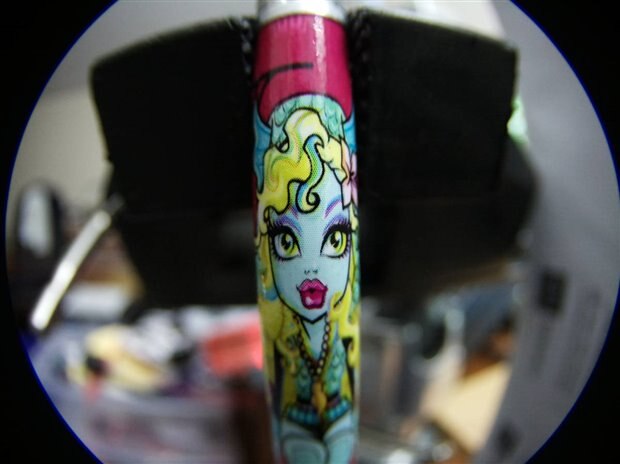
This is a picture of a pencil from 1 cm away. The black mass is a vise (see image below) You can see this lens is designed for smaller sensors, because light is not even getting to the corners of the sensor, and the top and bottom of the pencil are not in focus, but it is still a fun little lens – it would be tough to get this effect with a different lens.
Here is another picture to show that focus and depth of field aren’t a big problem, but this wide angle lens will always have some barrel distortion:
Now I have 5 lenses I can experiment with….
Weekend update:
After getting the time lapse system running, I wanted to experiment with taking pictures outside. To do this this I needed to put a display on the Raspberry Pi so I could focus the lenses.
I didn’t actually get around to taking any outdoor pictures, because I spent the weekend building a display:
You don’t have permission to edit metadata of this video.
Edit media
x
Subject (required)
Brief Description
Tags (separated by comma)
Video visibility in search results
Parent content
Poster
Upload
Preview
I consider this display system to be an expensive (for me) gamble – a big fragile display purchased in unassembled/untested form.
Fortunately it worked out extremely well. The display is fully functional, the resolution is high enough to clearly show the smallest text and it is bright enough to be used outside.
I still need to wait for some cables, but the system is now a lot more self contained.
More images:
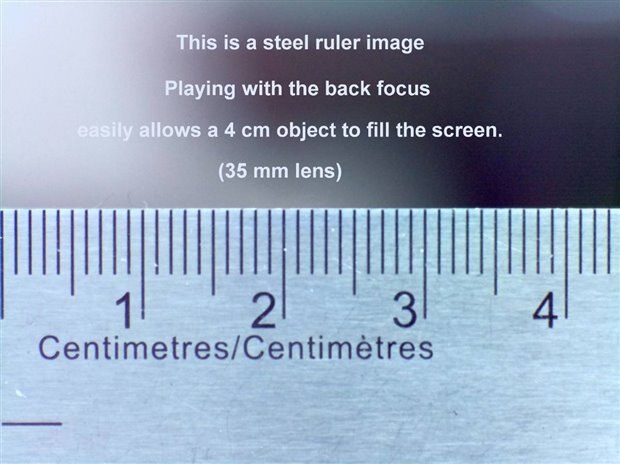
This picture shows that the camera can focus on and fill the screen with a 4 cm object, this is actually less than a 10 degree field of view:
By swapping a few low-cost lenses, this camera can be used to achieve a wide range of photographic effects.
Yet another update
I just received a sixth lens – which I had ordered from Newark for under $20. It is a Defender Security CCTV lens 6-15 mmDefender Security CCTV lens 6-15 mm.
It also works well with the HQ camera and covers a pretty useful range – here is an example:
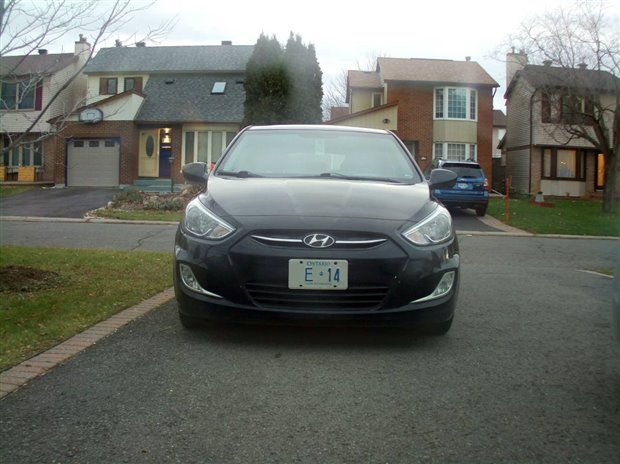
This was taken near the 6mm end of the lens. The 15mm end would have the car filling the screen.
It was late in the day, but the display was as visible outside as it was indoors.
The power cable for the display also came in, so the system is only missing a short HDMI cable – which has not arrived.
The system is now consolidated enough to take outside for a photoshoot, as this shot proves.
At some point I will want to add a camera controls interface with a physical shutter button and a video button, but hopefully someone will develop something I can clone before I have cleared my backlog of other projects.
One More Update – Persistence of Vision
You don’t have permission to edit metadata of this video.
Edit media
x
Subject (required)
Brief Description
Tags (separated by comma)
Video visibility in search results
Parent content
Poster
Upload
Preview
The 3D print file for HQ Camera Cover is attached in case somebody wants to use it.
Relevant links:
Raspberry Pi HQ Camera Road Test page
Raspberry Pi HQ Camera page with documentation
Feather Weather


